Handle documents
In the repository, you can manage models and objects, documents, and dashboards.
This section describes how to handle documents.
ARIS document storage enables you to manage temporarily or permanently saved documents. Access restriction on folder level is possible in ARIS document storage for users or user groups.
You can upload a document to ARIS document storage.
Prerequisite
You have the Document administrator function privilege.
Click
 Application launcher >
  Documents.
Click
 Add document. The corresponding dialog opens.
Navigate to the target folder.
Click
 Upload. The Upload new document dialog opens.
Click Select file and select a document.
Enter a title and, if required, specify further document details.
Click Upload.
You have uploaded a document to ARIS document storage.
You can link a new document to a model or object. We strongly recommend that you check documents for malicious software before uploading.
Prerequisite
You have the ARIS Connect Designer license.
Open the relevant model. The model is opened on a new browser tab.
Click
 Properties. The Properties bar opens.
Activate the Documents tab.
Click in the model background to add a document to the model or click the relevant object to add a document to the object.
Click
Add document. The corresponding dialog opens.Navigate to the target folder and select the document. To upload a new document, navigate to the target folder or create a new subfolder and click it.
Click
Upload. The Upload new document dialog opens.Click Select file and select a document.
Enter a title and, if required, specify further document details.
Click Upload. The uploaded document is positioned as the first document in the list and is selected.
Select the uploaded document and click OK.
The document is linked to the model or object.
Ask the person in charge to approve the documents you changed so that the changed document can be made available to all users.
Prerequisite
You have the ARIS Connect Designer license.
Open the model that contains the document that you want to have approved.
Click
Properties.Activate the Documents tab.
Select the relevant document.
Click
 Request approval. The corresponding dialog opens.
Click Submit.
The person responsible receives an e-mail with the relevant information and a link to the associated task. If the person responsible approves the changes, the current version of the document is made available in ARIS (status APPROVED). The document is visible in ARIS on the Documents tab. If rejected, the document receives the status REJECTED.
This workflow is a part of ARIS. It can be customized if required. For example, you can change e-mail texts, add notifications, make changes to dialogs. The integration of complex workflows (standard RCM, change management) requires the YCSPG or the YDCPG ARIS server license extension pack: Process Governance.
Alternatively, you can use Flow templates to define and manage workflows.
You can share documents with other users.
Prerequisite
You have the ARIS Connect Designer license.
Open the model that contains the document you want to share.
Click
Properties.Activate the Documents tab.
Select the document you want to share with another user.
Click
 Share document. The corresponding dialog opens.
Select the user you want to share the document with.
Enable Send copy to me to receive a copy of the message, if required.
You can also enter a subject and a comment.
Click Submit.
The selected user receives an e-mail containing the information you entered and a link to the corresponding document.
This workflow is a part of ARIS. It can be customized if required. For example, you can change e-mail texts, add notifications, make changes to dialogs. The integration of complex workflows (standard RCM, change management) requires the YCSPG or the YDCPG ARIS server license extension pack: Process Governance.
Alternatively, you can use Flow templates to define and manage workflows.
s
You can remove a document from a model or object.
Prerequisite
You have the ARIS Connect Designer license.
Open the model from which you want to remove the document from the model or object.
Click
Properties.Activate the Documents tab.
Click in the model background to remove a document from the model or click the relevant object to remove a document from the object.
Enable the check box of the document you want to remove and click Remove selected documents.
The document is removed from the model or object and no longer has any relationship to the model or object.
Ask the person in charge to approve the documents you changed so that the changed document can be made available to all users.
Prerequisite
You have at least the ARIS Connect Viewer license privilege.
The Person responsible document attribute must be specified for the relevant document with a user name that exists in user management.
The person responsible must have the ARIS Connect Viewer license or ARIS Connect Designer license.
The technical user arisservice has the function privilege Document administrator.
Click
Application launcher > Documents.Enable the check box of the document you want to have approved.
Click
Request approval. The corresponding dialog opens.Enter a comment describing what you changed.
Click Submit.
The person responsible receives an e-mail with the relevant information and a link to the associated task. If the person responsible approves the changes, the current version of the document is made available in ARIS (status APPROVED). The document is visible in ARIS on the Documents tab. If rejected, the document receives the status REJECTED.
This workflow is a part of ARIS. It can be customized if required. For example, you can change e-mail texts, add notifications, make changes to dialogs. The integration of complex workflows (standard RCM, change management) requires the YCSPG or the YDCPG ARIS server license extension pack: Process Governance.
Alternatively, you can use Flow templates to define and manage workflows.
You can share documents with other users.
Prerequisite
You have at least the ARIS Connect Viewer license privilege.
The Person responsible document attribute must be specified for the relevant document with a user name that exists in user management.
The person responsible must have the ARIS Connect Viewer license or ARIS Connect Designer license.
The technical user arisservice has the function privilege Document administrator.
Click
Application launcher > Documents.Enable the check box of the document you want to share.
Click
Share document. The corresponding dialog opens.Select the user you want to share the document with.
Enable Send copy to me to receive a copy of the message, if required.
You can also enter a subject and a comment.
Click Submit.
The selected user receives an e-mail containing the information you entered and a link to the corresponding document.
This workflow is a part of ARIS. It can be customized if required. For example, you can change e-mail texts, add notifications, make changes to dialogs. The integration of complex workflows (standard RCM, change management) requires the YCSPG or the YDCPG ARIS server license extension pack: Process Governance.
Alternatively, you can use Flow templates to define and manage workflows.
You can rename a document.
Prerequisite
You have the Document administrator function privilege.
Click
Application launcher > Documents.Navigate to the relevant folder.
Click the name of the document. The Document details page opens.
Click
 Edit.
Edit.Enter the new name in the File name box.
Click Save.
The name is changed.
You can show the versions, relations or history of a document. If a document is changed and uploaded again, a version history is created automatically. Only the 100 most recent versions of a document are displayed and can be accessed.
Click
Application launcher > Documents.Navigate to the relevant folder.
Click the name of the document. The Document details page opens.
Click Versions to display the version history of the document. The change description is displayed in the Comment column.
Click Relations to display the relations of the document.
Click History to display the history of the document. The history of the document is displayed. All changes to the document such as changes to metadata, locking, unlocking, and the uploading of a new version are displayed.
The versions, relations or history of a document are displayed.
You can begin the search for items directly on the start page of ARIS. The search finds only documents that have a maximum of one dot in their name.
Click in the Search box.
Enter the relevant term.
A list of the first results is shown as you enter the term. As you complete the term, the list will be updated.
In the list, click the entry in the category Documents to which you want to navigate. The document is downloaded.
You can open the document if the software required for opening the document is available on your local system.
You can use the Advanced Search to find items in ARIS document storage. The search finds only documents that have a maximum of one dot in their name.
In the Search field, click Advanced.
Click the context field and select Documents.
Enter the relevant term.
A list of the first results is shown as you enter the term. As you complete the term, the list will be updated.
Click one or more filter criteria. The selected filter criteria are displayed above the list and the search results are updated. If a selected filter criterion has subordinate properties, these are displayed below the Items area under Properties. Click the required property to display the associated selection boxes or text fields above the search area.
Select additional criteria.
Selected filter criteria are listed.
The input options depend on the property type. To define a date, for example, a calendar opens.
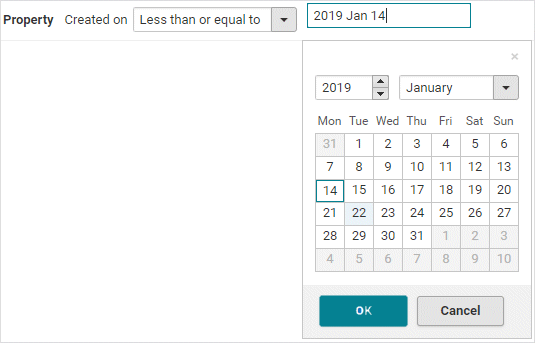
Select whether Selected filter criteria are listed or One of the following criteria met should be used.
To clear a selected filter criterion, click
 Clear in the line of the relevant filter criterion. The filter criterion will be cleared and the search result updated.
In the list, click the entry to which you want to navigate.
To see more search criteria, click Show more in the
 Filters area. The list is extended.
To clear all filter criteria for an area, click Clear subordinate filters.
To clear all filters and base your search on other search criteria, click Show all in the Filters area. All previously selected search criteria are cleared.
The list of results is updated based on the search context and the selected criteria.
Tags are used to provide additional data of documents. When you upload a document, you can add tags.
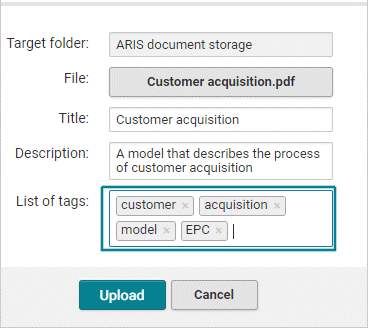
The tags are also displayed when opening the document details.