Place objects
In an open model, display the
 Symbols bar if it is not already open.
Click the object symbol you want to place in the modeling area.
Move the mouse pointer to the modeling area. The frame of the object is displayed. If Guided modeling is enabled, lines indicate the alignment of the moving object to the placed objects and arrows indicate the distances.
Click the position in the modeling area where you want to insert the object symbol. The name of the object symbol is selected for overwriting by default.
If necessary, overwrite the previous name with the name of your choice and press Enter.
The object symbol has been inserted in the modeling area.
You can place objects from the Symbols bar using drag and drop.
In an open model, display the
Symbols bar if it is not already open.Click the object symbol you want to place and hold down the mouse button.
Move the mouse pointer to the desired position in the modeling area and click again to place the object. If you have enabled Guided Modeling, lines and arrows inform you of the orientation and distance of the dragged object from adjacent items.
Release the mouse button. The object is placed, and its name is selected for overwriting.
Enter a name. If you enter an existing name, existing objects are offered for selection. You can create a new object, select an existing one, or create a new one with the same name.
Click in the modeling area or press Enter.
You have placed an object from the Symbols bar with drag and drop. You can also place objects with drag and drop using Smart Modeling.
Display the
Symbols bar if it is not already open.In the Select and insert symbol box, enter a few characters of the object symbol name. All object symbols whose names contain these characters are listed, regardless of whether they are hidden or shown in the symbols bar. The list is continuously updated while you are entering your input.
In the list, click the object symbol you want to place in the modeling area.
Move the mouse pointer to the modeling area. The frame of the object is displayed. If Guided modeling is enabled, lines indicate the alignment of the moving object to the placed objects and arrows indicate the distances.
Click the position in the modeling area where you want to insert the object symbol. The name of the object symbol is selected for overwriting by default.
If necessary, overwrite the previous name with the name of your choice and press Enter.
The object symbol has been inserted in the modeling area.
You can use the mini toolbar to link objects.
Prerequisites
The mini toolbar is only available if Smart Modeling is disabled.
Click the placed object symbol. The mini toolbar is shown.
In the mini toolbar, click the symbol you want to place in the modeling area.
The Select connection box and the outline of the object are displayed. The currently used connection is marked with a preceding bar and is highlighted in bold.
Click another connection or close the Select connection box with
 Close.
Move the mouse pointer to the modeling area. The frame of the object is displayed. If Guided modeling is enabled, lines indicate the alignment of the moving object to the placed objects and arrows indicate the distances.
Click the position in the modeling area where you want to insert the object symbol. The name of the object symbol is selected for overwriting by default.
If necessary, overwrite the previous name with the name of your choice and press Enter.
The object symbol is placed in the modeling area and linked to the previously selected object symbol using the selected connection.
With Smart Modeling, you can easily place new and existing objects.
Open a model.
Select the object you want to connect with a new object. The
 Insert icons are displayed.
Click the
Insert icon of the direction in which you want to place the object. The Smart Modeling toolbar opens.Click an object shown on the Smart Modeling toolbar you want to place. The object is inserted in the direction you selected the
Insert icon and a connection is created to the previously selected object. The name of the new object is selected for renaming.Enter a name. If you enter an existing name, existing objects are offered for selection. You can create a new object, select an existing one, or create a new one with the same name.
If selectable connections are displayed, click another connection or click in the modeling area to obtain the current connection.
With Smart Modeling, you have placed an object at the specified distance.
If an object has already been placed in the modeling area, you can create a new occurrence for this object. This enables you, for example, to insert the same organizational unit at all positions in a process where it participates in the process.
Click the placed object symbol and then
 Copy.
Copy.Click
 Paste. Alternatively, press Ctrl + V. A frame for the occurrence copy is displayed in the modeling area.
Drag the frame to the required position. Lines indicate the alignment of the moving object to the placed objects and arrows indicate the distances.
Click the position in the modeling area where you want to insert the object symbol.
The object symbol is placed in the modeling area. It represents the object whose object symbol you copied as an occurrence copy. This means, for example, that the name of both object symbols is changed, that is, the name of the copied object symbol and the name of the object symbol copy, if you change it for ONE of the two.
If an object has already been placed in the modeling area, you can use it as the basis for a new object. Thus, you only need to change the attributes by which the new object differs from the source object.
Click the placed object symbol and then
Copy.Click
 down arrow > Definition copy next to Paste. Alternatively, press Ctrl + Shift + V. A frame for the definition copy is displayed in the modeling area.
Drag the frame to the required position. If you have enabled Guided Modeling, lines and arrows inform you of the orientation and distance of the dragged object from adjacent items.
Click the position in the modeling area where you want to insert the object symbol.
The object symbol is placed in the modeling area. As a definition copy, it represents a new object using the attributes of the object whose object symbol you have copied. The new object is autonomous even though it has the same attributes as the source object. This means, for example, that the name of the copied object does not change if you change the name of the source object.
You can easily place objects directly below each other.
Prerequisite
Guided Modeling is enabled.
Open a model.
Drag the object to the border of the object under which you want to position it directly. It snaps into place here.
Release the mouse button.
The object is now placed directly below the other object:
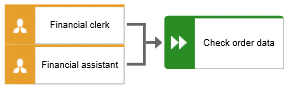
You can quickly place structurally relevant objects between existing objects using drag and drop. You can place objects between existing objects under the following conditions:
Drag, paste, or place only a single object.
Drag the object that you want to place only onto a single connection.
Do not place source and target objects in an object.
Both the connection between the source and target objects is structurally relevant (process-flow) and the source and target objects themselves are structurally relevant.
In an open model, display the
Symbols bar if it is not already open.Click the object symbol you want to place and hold down the mouse button.
Drag the preview frame between the objects where you want to place the object. When the preview frame is over a connection between objects between which the selected object can be inserted methodically correctly, the connection is colored green.
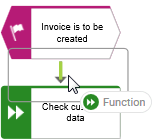
Release the mouse button. The object is placed, the lower objects are moved, and the connections are newly linked. The name of the new object is selected for renaming.
Enter a name for the object. If you enter an existing name, existing objects are offered for selection. You can create a new object, select an existing one, or create a new one with the same name.
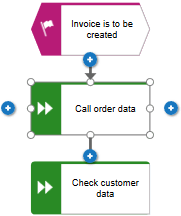
You have quickly placed a structurally relevant object between existing objects. You can also place objects with drag and drop using Smart Modeling.
You can easily rearrange objects with drag and drop.
In an open model, click the object you want to move and hold down the mouse button.
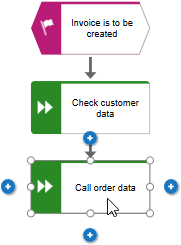
Drag the preview frame between the objects where you want to place the object. If you have enabled Guided Modeling, lines and arrows inform you of the orientation and distance of the dragged object from adjacent items. When the preview frame is over a connection between objects between which the selected object can be inserted methodically correctly, the connection is colored green.
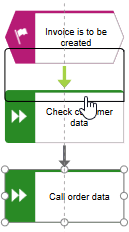
Release the mouse button. The object is placed, the lower objects are moved, and the connections are newly linked.
You have rearranged objects using drag and drop. You can also place objects with drag and drop using Smart Modeling.
Click the relevant object symbol in the
Symbols bar or in the Smart object toolbar and hold down the mouse button.Move the mouse pointer to the modeling area. If you have enabled Guided Modeling, lines and arrows inform you of the orientation and distance of the dragged object from adjacent items.
Drag the object symbol over a connection or the position in the modeling area where you want to insert the object symbol.
Release the mouse button. The object is placed, and its name is selected for overwriting.
Enter at least two letters. A list of existing objects is displayed. They have the same type as the placed object and their names begin with the letters entered.
Click the name of the object you want to create as an occurrence copy. The name is entered in the object.
The occurrence copy is placed.
Click the relevant object symbol in the
Symbols bar or the mini toolbar.Move the mouse pointer to the modeling area. If you have enabled Guided Modeling, lines and arrows inform you of the orientation and distance of the dragged object from adjacent items.
Click the position in the modeling area where you want to insert the object symbol. The name of the object symbol is selected for overwriting by default.
Enter at least two letters. A list of existing objects is displayed. They have the same type as the placed object and their names begin with the letters entered.
Click the name of the object you want to create as an occurrence copy. The name is entered in the object.
The occurrence copy is placed in the modeling area.
In the modeling area, click the object of which you want to create an occurrence copy.
Click
Copy in the toolbar.Click
Paste in the toolbar. A frame for the occurrence copy is displayed in the modeling area.Drag the frame to the required position. If you have enabled Guided Modeling, lines and arrows inform you of the orientation and distance of the dragged object from adjacent items.
Press the mouse button.
You have placed the occurrence copy.
You can place an object in another object. The object then overlaps the object in which it is placed and has an implicit connection to this object. Implicit connections are connections that are not being displayed while an object is placed in another object.
Click the object you want to place in another object, and hold down the mouse button.
Drag the object on top of the other object, position it inside the other object's borders, and release the mouse button. If multiple connections are available between the two objects, the connection selection is displayed. A right arrow is added to the outgoing connections of the embedded object, while a left arrow is added to the incoming connections.
Click the connection you want to draw between these two objects. The connection created is an implicit connection, which means that it is not displayed while the object is embedded in the other object.
The object is now placed in the other object. Due to the existing implicit connection, the embedded object is also selected or moved when the object in which it was placed is selected or moved. If you drag the nested object onto the model area, the connection between the two objects is automatically displayed.
Tip
You can place multiple objects of one type in an object at once.
You can place an object on another object. The object then overlaps the object on which it is placed but has no implicit connection to this object. Implicit connections are connections that are not being displayed while an object is placed in another object.
Click the object you want to place on another object, and hold down the mouse button.
Drag the object on top of the other object, position it inside the other object's borders, and release the mouse button. The connection selection is displayed.
Click
No connection. Thus, no connection is created between the two objects.
The object is now placed on the other object. Due to the lack of an implicit connection, the embedded object is neither selected nor moved when the object on which it was placed is selected or moved. If you drag the overlapping object onto the model area, no connection between the two objects is displayed.
You can place objects on other objects or in other objects. The difference between these two procedures is as follows: When placing an object on another object you specify that no implicit connection will be created between the objects. In contrast, when placing an object in another object you specify that an implicit connection is to be created between the objects.
You can place multiple objects of one type in an object at once. If you want to embed two objects at once and object 1 already has a connection to the enclosing object while object 2 has none, proceed as follows when creating connections:
Select the connection that exists between object 1 and the enclosing object: this connection now links both objects to the enclosing object.
Select a connection other than the one that exists between object 1 and the enclosing object: object 1 is now linked to the enclosing object via two connections - the existing connection and the one you have selected. Object 2 uses a new connection.
Objects that were placed in other objects are also moved when the enclosing object is moved. If an enclosing object is selected, the embedded object is selected as well. This indicates clearly that an object is embedded in another object. In contrast, a non-embedded object is neither selected nor moved when the object on which it was placed is selected or moved.
You can drag an embedded object from an enclosing object to the model background. The connections linking the objects are then displayed.
You can paste a copied object into a model as an occurrence copy. Thus, a new occurrence is created, that is, a new graphical representation of the object. This means, for example, that changing the name of this occurrence will change the name in all occurrences of the copied object.
Prerequisite
The object is allowed to exist in the target model according to the method.
Select the relevant object.
Click
Copy. Now you can insert the copy into the current or another model.Click
Paste > Occurrence copy. Alternatively, press Ctrl + V. The frame of the object is displayed.Move the mouse pointer to the relevant position. If you have enabled Guided Modeling, lines and arrows inform you of the orientation and distance of the dragged object from adjacent items.
Click the position in the modeling area where you want to insert the object symbol.
Copying and pasting the occurrence of an object is now complete.
Occurrence copies enable you to quickly reuse the same object at different positions in the same model or to reuse it in various other models.
You can paste a copied object into a model as a definition copy. Thus, a new object is created whose attributes are identical to those of the copied object. Changing the attributes of the pasted object will not affect the copied object.
Prerequisite
The object is allowed to exist in the target model according to the method.
Select the relevant object.
Click
Copy. Now you can insert the copy into the current or another model.Click
Paste > Definition copy. The frame of the object is displayed.Move the mouse pointer to the relevant position. If you have enabled Guided Modeling, lines and arrows inform you of the orientation and distance of the dragged object from adjacent items.
Click the position in the modeling area where you want to insert the object symbol.
Copying an object and pasting it as a definition copy is now complete.
Using definition copies reduces the effort of creating multiple objects that differ only in a few attributes.
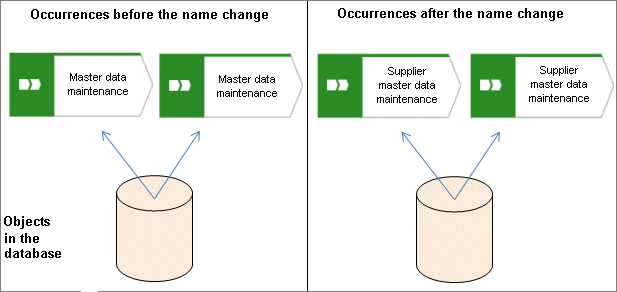
An occurrence copy is only a copy of a graphical representation of an object. Thus, when you create an occurrence copy, a graphic is created that references the copied object:
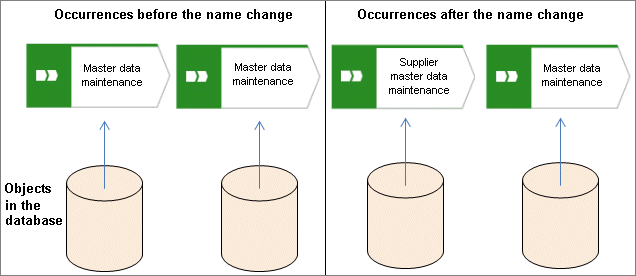
When you create a definition copy, an entirely new object is created whose attributes are identical with those of the copied object:
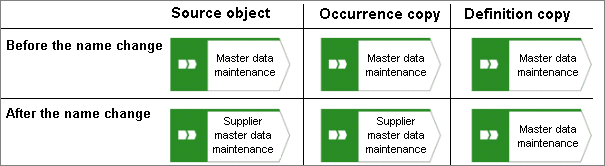
If attributes of an object are changed, this change also applies to the corresponding attributes in all occurrences of the object. This becomes clear when changing the Name attribute:
You can paste objects into a model if they are methodically allowed in the model.
Suppose you have copied objects of type Function and Organizational unit to the clipboard. If you paste the contents of the clipboard into a model of type EPC, the functions and organizational units will be inserted in the model because both object types are methodically allowed in EPC.
However, if you paste the content of the clipboard into a model of type Organizational chart, only the organizational units will be inserted, because objects of type Function are not methodically allowed in the organizational chart. When you paste the objects, the functions are shown crossed out (x), so you know that they will not be pasted.